Table of contents
How to go live on Instagram? Many users of the popular photo-sharing app Instagram are looking for ways to go live on their accounts. Live videos can be an excellent way to strengthen relationships with followers by following what you’re up to in your day and sharing memorable moments with them.
Here’s a step-by-step guide on how to go live on Instagram.
Step by step guide on how to go live on Instagram
This step-by-step guide will show you how to stream live on Instagram. Please look at our three steps to get started with an Instagram live video and then try your first stream.
Step 1: Start Instagram live streaming.
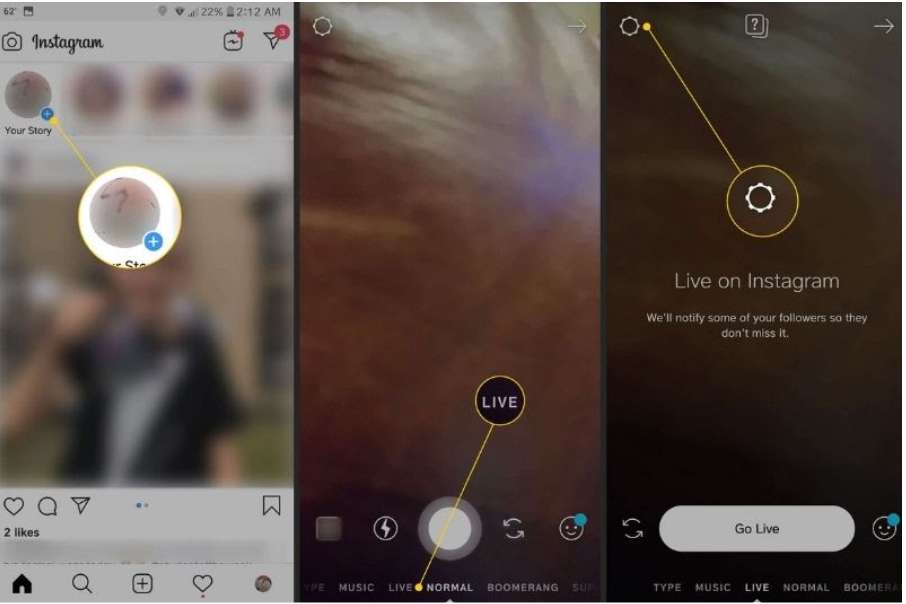
Although it may seem simple, it is not. You can start an Instagram broadcast by clicking on the photo titled Your Story at the top. There will be a small plus sign in blue next to it. This bar might have vanished if you scroll through your feed. In this case, tap the camera button at the top left to bring it back.
You should now be in your story menu. This will allow you to choose from three options.
Live: This is Instagram Live Streaming. The stream disappears immediately after the broadcast has ended.
Normal: You can upload a photo or video here that will be available for 24hrs
Boomerang: You can upload a bunch of photos that are merged to create a time-lapse video.
You will need to click on the “Live” option to stream Instagram live.
To ensure that the broadcast is visible to the correct people, check your settings before you broadcast. You can edit who is allowed and blocked from messaging you about the story. Instagram introduced a new feature last year that will enable you to save your stream to your camera roll. However, the save shared pictures’ setting is not available for live streams.
You’re now ready to go. Once you are sure that the camera is pointed in the right direction, take a deep breath and click Start Live Video to begin.
Step 2: Manage the stream.
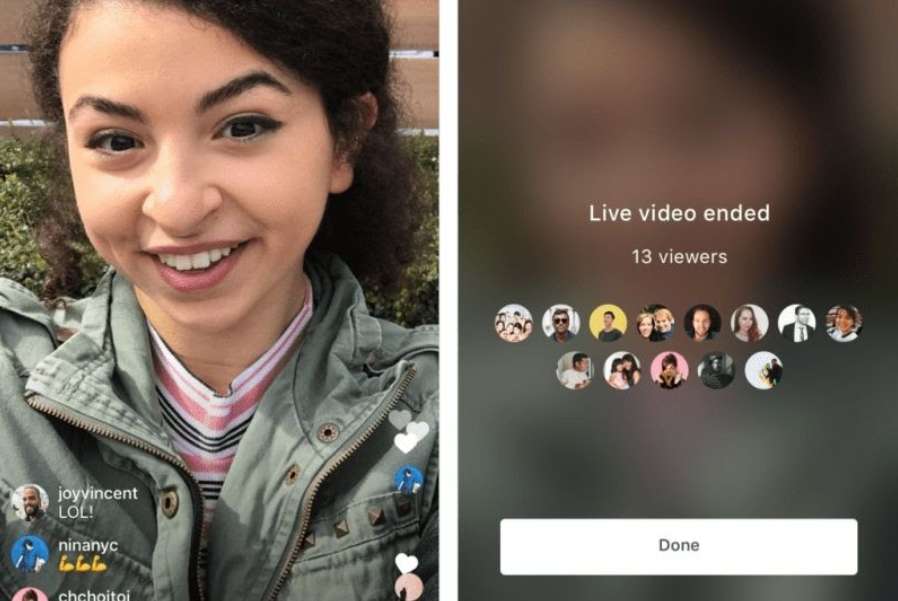
It’s important to consider how you will handle your live broadcast while on Instagram. You can do this by using a few settings on Instagram.
Viewer count: You will see a number beside an eye in the upper right corner of your screen. This shows you how many people are watching your stream at the moment. This will give you an indication of how engaged they find your content by watching when they leave or join.
Comments: You’ll find a comment box at the bottom. This will display any comments left by viewers. Multitasking is a skill that allows you to respond to comments at your own pace. You can also ask viewers to send you messages with their feedback so you can reply after the stream. To turn off commenting, tap the three dots at the bottom right.
Likes: Viewers can show their affection for your video by clicking on the heart animation. You can thank them for their support and encourage more likes wherever you can.
Time broadcasting: To see when your stream has been broadcasting, tap the button that says live.
Block user: To check who is watching you, tap the eye that counts your viewers. To remove someone who is causing trouble, click the x next to their name.
It is essential to manage your stream effectively. Make sure you know what you are going to cover and that you don’t interrupt your flow. There are no retakes for this kind of content. Make sure to spend enough time preparing to make a fantastic video the first time.
Step 3: Wrap up the broadcast
Hit the End button at the top of your screen to end your stream. Instagram will only return the minimal analytics that they have for your stream. This is the number of viewers. Instagram Analytics does not record any data regarding your live streams. You must do this for future reference. Take a screenshot and note it down so you can compare the results of different video topics.
Now is the time to honor any promises you made during your live stream. You should set aside some time after the video is over to respond to any direct messages and questions and send any information promised. Your followers will appreciate your quick response.
Video:
How to live stream on Instagram with a guest
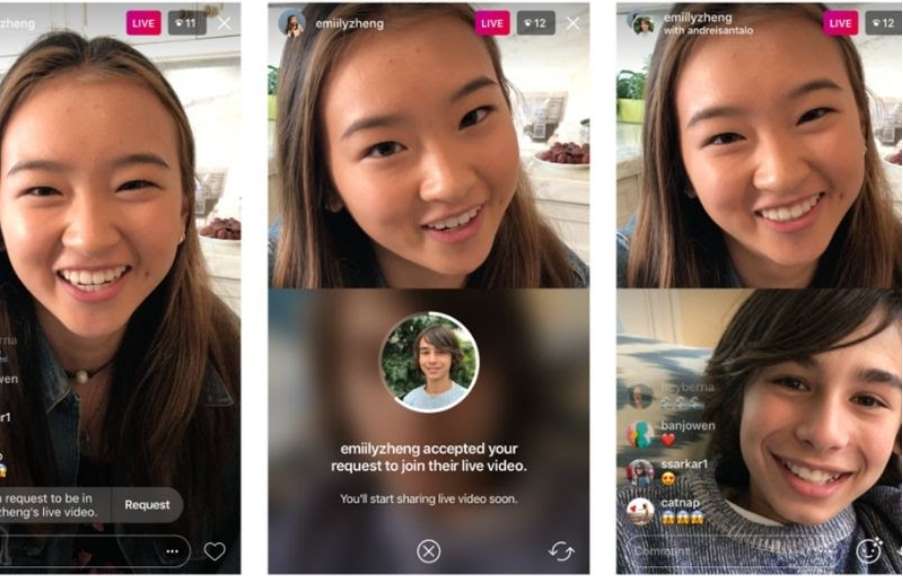
1. Open the Instagram app for Android or iPhone.
2. Tap the plus sign icon “+” in the top-right corner. You can also swipe left to access the same screen.
3. You’ll be taken directly to the New Post page by tapping the plus sign or swipe left. To select Live, swipe to the right from the menu bar located at the bottom of this page.
4. The camera screen will now open. To add a title, tap the icon with four lines on the left. To make your video a fundraiser, tap the circle icon with a heart inside it.
5. Tap the circle icon at the bottom of the screen to go live.
6. After you are live, tap on the icon of a camera at the bottom. You can either enter the username or search for the person you want to live stream from this screen. To invite someone to your live video, select a user.
7. Only live can be done with someone who is watching your live video. You can invite anyone to your live video, but they must be logged in. To do this, tap the circle button beside their name and then select Send Request.
8. After they accept your request, your video will appear on a split-screen alongside theirs. Tap the “X” in the upper-right corner of your friend’s screen to remove them from the Live video.
9. Tap the “X” at the upper right-hand side and select End Now in the popup. After the live video is over, Instagram will display the number of people who viewed it and allow you to share it for 24 hours. You can also choose to delete the video.
FAQs
Why can’t I go live on Instagram?
Instagram has been a revolutionary platform for influencers and celebrities to share their thoughts, lives, and adventures with the world. However, going live on Instagram is not possible for all users. Many would ask why they can’t go live on Instagram if it is a newer function that is becoming popular for everyone to use. Well, it’s a great question, but a hard one to answer.
At this point, Instagram does not provide a definitive answer as to why certain users can’t go live on Instagram. However, we may be able to shed some light on this question and offer our personal insights into the topic.
How long am I blocked from going live on Instagram?
You may be blocked from going live on Instagram for a day, a week, or a month. It all depends on how many times you have been blocked before. If you want to go live again, you will need to wait the appropriate time before going live again.
For a day or a week, this would mean waiting a certain amount of time before going live again.
Even more interestingly, if you have been blocked more than a month ago and attempt to go live on Instagram again, it will be blocked again for the same amount of time as you were blocked for previously.
Is Instagram Live delayed?
I’m not sure if Instagram is delayed, but it’s something I’ve seen my friends do. One thing you might want to try is using the app Livestreamer and connecting your Instagram to the streaming service with it.
This way, you can stream live on Instagram and not worry about it being delayed. I would recommend trying this if you’re worried about it being delayed and don’t want to miss your followers!
Do you need Instagram to watch Instagram live?
Yes! It’s not possible to watch Instagram live on the Web, only on your mobile device. That being said, it’s still possible to watch Instagram live on your computer if you want to. All you need is the Instagram app for Android or iOS.
How do you go live on Instagram without them knowing?
You can go live on Instagram without them knowing by opening the app and turning on your location settings. You can then open up your profile by swiping left and switching the app to the public. Find a popular hashtag and type it in the search bar and it will show you trending posts. Click on one of these hashtags and you will be able to post a live video for all your followers to see.
Conclusion
In conclusion, Instagram Live is a great feature that allows people to interact with their followers in real-time. This would help them further connect with others, especially when combined with tools like an Instagram profile picture viewer to better understand your audience.
After you do this, your social presence will grow. However, don’t abuse it! If you want to go live you should use the hashtag and only do so when it’s appropriate.
Thanks for reading our guide! We hope you found it useful! If you did, please consider sharing it.
